Boil Boil Toil and Trouble Ultra Purple Witch Nails

Purple Witch Nails 2

I don’t want to type much today.  Here are my purple witch nails.  I put loose glitter on the non-accent nails that make me think of mermaids.  Usually I match my right and left hand, but in this case I only did a witch on my right.  I love the purple color by Ulta, but I was having some trouble with the brush and also this color responds strangely to topcoats.  Enjoy!

Purple Witch Nails 5 Purple Witch Nails 1
Purple Witch Nails 3 Purple Witch Nails 4

Polishes Used:

  1. Seche Vite Base Coat
  2. Ulta Ultra Violet Femme for the purple background
  3. Sally Hansen Xtremewear Black Out for the black witch’s hat and eye dots
  4. Sally Hansen Xtremewear Perfect Pear-ing for the witch’s face
  5. Sinful Color’s Summer Peach for the witch’s hair
  6. Ulta High Roller for the gold buckle
  7. Sally Hansen Xtremewear Wet Cement for hat accent
  8. Loose glitter that I got from the Dollar Tree, woot!
  9. Poshe Top Coat

Removing Glitter Polish Like A Pro

In many cultures and civilizations there exist rights of passage where, upon completion, a member moves from one rank to another or is considered a more integral part of the group. I feel like in The Naildom (The Domain of Nails) having your first rage inducing hour-long session of removing glitter polish is a right of passage.

The problem is I don’t think this is a right of passage anyone should really endure, no matter how masochistic one may be.  I don’t think you need to have shreds of cotton balls stuck to all your sparkle coated fingers while you’re spewing profanities (totally not speaking from personal experience).Rainbow Glitter

I’m here to tell you there’s a better way.  I’m here to help you transcend from your lowly nail scrubbing practice to the magical world of tinfoil finger hats (<—what?).

Steps To Removing You Sparkle Nails

  1. Gather supplies – cotton balls or pads, tinfoil, scissors, polish remover (acetone works best, but is strong).IMG_0497

  2. Use scissors to cut tinfoil into 5 squares somewhere around 3×3″ – play around with the size that fits your fingers best.
  3. Put some polish remover on a cotton ball, place cotton ball on fingernail, then wrap tinfoil over fingertip and cotton ball together.
  4. Repeat with four other fingers and let sit for 2-3 minutes.  I like to do one hand at a time, but you can do all 10 fingers at once if you have the skill.  If you only do one hand at a time then you can reuse the foil and cotton balls on the opposite hand.IMG_0502
  5. Remove the foil/cotton ball from each finger, then reuse the cotton balls to EASILY swipe of the softened glitter polish.
  6. Repeat on other hand.
  7. I follow up this removal by scrubbing my hands/nails with a homemade coconut sugar scrub (mix sugar and coconut oil) which helps remove most of those leftover little glitter bits and also gives your nails/hands a punch of moisture and softness after soaking with the polish remover.
  8. Bask in the glory that you just took off your glitter polish in a few minutes versus a few hours.IMG_0510

Sakura Cherry Blossom Nails with Matte Green Base

Sakura Cherry Blossom Nails

Happy Monday.  I’m submitting this post a little out of order because after I wrote my draft I somehow didn’t save it properly so I have to reeeewwwrrrriiittteee it.  Anyway, Arizona Iced Tea anyone?  I can’t say this mani was inspired by the drink of my childhood, however, it definitely is reminiscent of their old can.  I did also have someone tell me it reminded them of a porcelain teacup.

Polish Performance

This manicure was my first attempt at using a matte top coat as well as my first time using Sally Hansen’s Complete Salon Manicure line.  I will say I now know why this line runs for around $8 versus the the $2-3 you’ll pay for their Xtremewear line.  The brush is amazing!  I had to do ZERO clean up on this manicure because I had so much control with the brush and polish.  It’s very soft and it has a rounded shape that fit the curve of my cuticles perfectly.

I was quite surprised at how thin one coat of the polish is…so surprised that I took a photo.

1 Coat of Sally Hansen Jaded

1 Coat of Sally Hansen Jaded

I used two coats, but really I think this polish would be best with 3 or 4 if you want full opacity.  I definitely like the color of it too and I will say that these photos don’t do it justice (the pics look a little more grey and less green).

The matte topcoat did what it said, it turned super shiny polish into a smooth flat matte finish.  I did notice some micro bubbles and I’m not sure whether it was from the top coat or from not letting the colored polish below dry long enough.  I was on the fence about matte manicures for a long time, but this experiment has definitely changed my mind and I look forward to playing with more options!

Techniques:

The branches were just a simple few lines drawn with a fine paint brush and the flowers involved using one of my jenky homemade dotting tools (read: a sewing needle stuck into the pink eraser of a pencil).

Place 5 dots of polish in a circle and then place the needle in the center of each circle and drag a line towards the center.  This will create the look of dimensional petals.  I put a dot of CG Fairy Dust in the center of each flower for extra pop.  You can always use a different number of dots to get a variety of flower patterns.

Polishes Used:

  1. Seche Vite Base Coat
  2. Green Base – 2 coats Sally Hansen Complete Salon Manicure Jaded
  3. China Glaze Matte Magic Top Coat
  4. Branches – Ulta Taupe On A Rope
  5. Flowers – Essie Luscious Lips
  6. Flower center accents and forefinger – China Glaze Fairy Dust

What are your favorite polish colors to make matte?

RAINBOW SPARKLES! 3 Color Glitter Gradient

So. Much. Sparkle

So. Much. Sparkle

Roses are red

Violets are blue

I love rainbows and sparkles

So look at my freaking nails!


Rainbow Glitter


Technique:

This is three coats of each color.  Basically I put gold at the base of each nail, then went back around and put green in the middle of each nail, then painted blue on the tip of each nail.  Rinse and repeat two more times.  These do not have a top coat currently, although I may add one on to see how it looks and to make the polish hold up.

Polishes Used:

  1. Seche Vite Base Coat
  2. Gold – Ulta Boogie Nights
  3. Green – Pure Ice Treasure Hunt
  4. Blue – Ulta Indigo-Go Girl

Cute Animal Stamping Plate From BornPrettyStore.com Review

Stamping Plate Video Intro Page

From the time I was a little girl going into Hello Kitty stores to my adult life watching anime and visiting Japan I have always loved the kawaii (meaning cute in Japanese) culture and characters.

I recently got the S10 “Cute Rabbit Cat Animal Design Nail Art Stamp Template” from BornPrettyStore.com and using this adorable stamping plate was high on my priority list after a week long trip to visit my dad in Canada… it’s true, I was suffering some nail art withdrawals from being away :D.

The stamping plate has 7 different little characters on it – bunny, kitty, teddy bear, chick, panda, giraffe and the seventh is what I like to call the “mystery animal”; I think it’s a sheep?  My confusion lies in the fact that what would appear to be horns and ears look more like two sets of ears – I think it’s a cute character either way, but would love to hear your guesses!BPS Stamp Plate S10

Glitter Pastel RainbowI started out with a different color on each nail, all topped with the beautiful, glittery, pearlescent Ulta Diva (I love putting this over a bunch of different colored nails because it ties them all together and makes them look a little more pastel).

Each nail is also stamped with a different color, none of them are made specifically for stamping.  I used a combination of thick quick-dry polishes and thinner shimmers to see how both turned out.

The thin outline images on the plate (the chick, bunny, kitty, panda and mystery animal sheep thing) seemed to work better with the thin nail polishes.  When I tried to use the insta-dri polishes on the thin outline images they didn’t transfer well; I think this is because the lines are so fine that the thick polish dried almost instantly.  The Insta-Dri polish worked great on the bear (which doesn’t have thin lines) and pretty well on the giraffe where there are big spaces for polish to fill.

Kawaii Stamp Glitter Rainbow Better Kitty PinkyLeft Kawaii Stamp Rainbow Glitter

Overall I’m really pleased with the plate and for 99 cents and free shipping I don’t think it can be beat!

A total of 11 colors plus Seche Vite Base Cout and Poshe Top Coat

  1. Ulta Peach Parfait
  2. SH Insta-Dri Petal Pusher
  3. Ulta Cream of the Crop (on clearance in some stores)
  4. Ulta Mint Condition
  5. Ulta Bam-Blue-Zled
  6. Ulta Diva
  7. SH Insta-Dri Sonic Bloom
  8. SH Insta-Dri Snappy Sorbet
  9. Chi Razzle Dazzle
  10. Ulta Dance Teal Dawn
  11. Ulta Ultra Violet Femme

On a side note I’m really happy that I picked up the Poshe Top Coat, it’s very similar to Seche Vite, but without the toulene.  It didn’t smear the polish underneath, not much shrinkage and no chipping as of day 3.  Much better than the Orly Top Coat I recently purchased!

Rainbow Kawaii Polish 1Stamping Kawaii Polish 1Rainbow Kawaii Polish 2Stamping Kawaii Polish 2

If you get anything from their online store use the code EAG10 for a 10% discount.

As an exciting bonus if 10 people place orders with that code BornPrettyStore will sponsor a free giveaway contest for my website!  If it’s for free, it’s for me :D.

Coming up next will be holographic polish and nail stud reviews!

Disclaimer: I received the S10 stamping plate as a free promotion, however all opinions expressed are my own!

Holo Racing Stripe – Plus Seche Vite vs Orly Sec ‘n Dry

Holo Racing Stripe

I feel like I should go drive a fast car right now! The original plan for this set was to do stamping on top of the colors, but I liked the simple look so much that I stopped while I was ahead. I feel like the racing stripe on the thumb really makes this manicure pop and I can’t stop staring!

Also, I’m officially in love with holographic nail polish and now I know I’m going to want more. I picked up this LA Splash “Sparkling Torpedo” at Bed Bath and Beyond on a whim to get my order up so I could use a $5 off coupon. It was fairly solid at 2 coats, but I did a third for good measure. Well worth the $3! The coral-reddish color is 3 coats of Milani “Just Peachy”, which I found at the dollar store – totally worth it, this color is fabulous. It’s super shimmery and applied really smooth (not thick), but doesn’t dry super glossy so use a topcoat for extra shine.

My Seche Vite topcoat is almost out so on the same trip I picked up Orly’s Sec ‘n Dry to see how it compares. I used Orly on most of my fingers, but the pinky’s got the dregs of the Seche. I think the Seche drys slightly faster, is also slightly glossier, but thicker so potentially more difficult to apply. The Orly polish is toulene free (it still smelled strong) and applied smoothly. I bumped a nail probably 10-20 minutes after application and got a small smudge, so for now I will say that I think Seche probably still does a better job. I’ll keep an open mind since I have only tried the Sec ‘n Dry once.

Which fast dry topcoat do you prefer?

Happy Fourth of July – Independence to Paint your Nails!

4th of July Nail Collage copy

This week’s fun (and first) installment of Emma’s Nail Notes is dedicated to one of my favorite holidays, the Fourth of July!  I was born in Canada, but raised in California since the age of 2 and I wholeheartedly consider myself an American.  Sure, we’re celebrating the country’s independence from Great Britain, but my real love of The Fourth comes from the inevitable fireworks (pretty sparkly things), BBQ’s, the heat, and, most importantly, a great excuse to play fashionista with the good ol’ red, white and blue.

A great way to make your mani’ work for both before and after The Fourth is to get a basic color gel set done and then just do your decorations in regular polish on top.  After the holiday you can just swipe off the patriotic design with regular polish remover, but still have your gel nails for a few more weeks!  Red, white or blue are obvious choices, but silver and black would make great bases for designs as well.

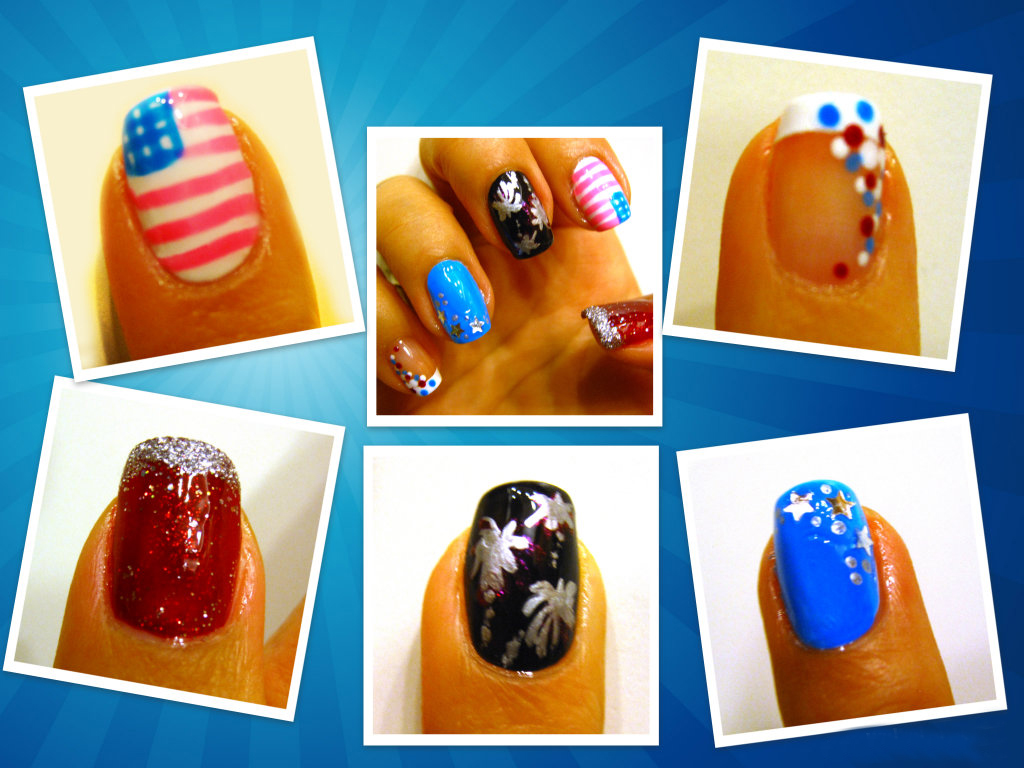
Here are my top ten picks for Fourth of July nail art this year:

10. If you’re rushed for time, just paint your nails alternating red, white and blue solid.

9. Crackle, use white as a base with red and blue crackles on top.

8. Blue nails with a red accent nail, put little white rhinestones on the blue for stars.

7. Fancy french tips, instead of white, alternate red white and blue on the tips.

6. Get mini star confetti and apply to a solid blue background.

5. Red, white and blue “dotticure” – just get a toothpick or pin and go to town!

4. Try your hand at taping some red and white stripes, you can buy thin striping tape for $1 on ebay.

3. Fireworks!  Use a brush and some silver or sparkle polish and make fireworks on a black or dark blue background.

2. Anything sparkly – you can’t go wrong with red, silver or blue sparkles.

1. The Classic Flag painted in neon or pastel hues for a current twist!  Just get a thin brush and it’s easy to do.

What are your 4th of July Nails?